

Make a 3D Spinning Logo with ThreeJs
Chapter 2: Setting up our very first scene, importing a GLTF Model and making it spin!


Introduction 🫱🏽🫲🏿
This article will acquaint you with some ThreeJs Boilerplate, Basic Animation, and Importing Models.
If you don't want a rundown and just want the code, head to the end.
Let's get started!
Getting ThreeJs ⬇️
First we'll need to actually get the ThreeJs Package so we can work with it.
If you're working with webpack, you can just
yarn add three
OR
npm install --save three
and then it's a simple matter of
import * as THREE from 'three';
You can also do this if you're using react or any of its derivative lessons, but it'd be more appropriate to use React-Three-Fiber for that, tutorials for that coming soon as well : )
If you're using vanilla JS you can do
<script async src="https://unpkg.com/es-module-shims@1.3.6/dist/es-module-shims.js"></script>
<script type="importmap">
{
    "imports": {
        "three": "https://unpkg.com/three/build/three.module.js"
    }
}
</script>
<script type="module">
    import * as THREE from 'three';

    /** CODE HERE */
</script>
Checking for WebGL ✔️
For ThreeJs to Render (with WebGL Renderer), the browser needs to have a WebGL implementation,
You can check if it does or not by,
/* If using Webpack */
import { WEBGL } from "three/examples/jsm/WebGL.js";
/* If using vanilla */
import { WEBGL } from "https://cdn.skypack.dev/three/examples/jsm/WebGL.js";

if ( WEBGL.isWebGLAvailable() ) {
/* It does, Go ahead */
} else {
    const warning = WEBGL.getWebGLErrorMessage();
    document.getElementById( 'container' ).appendChild( warning );
}
Most browsers already have WebGL compatibility though so usually you wouldn't need to do this.
Renderer and Scene Setup 🌎
Let's Create the Renderer First
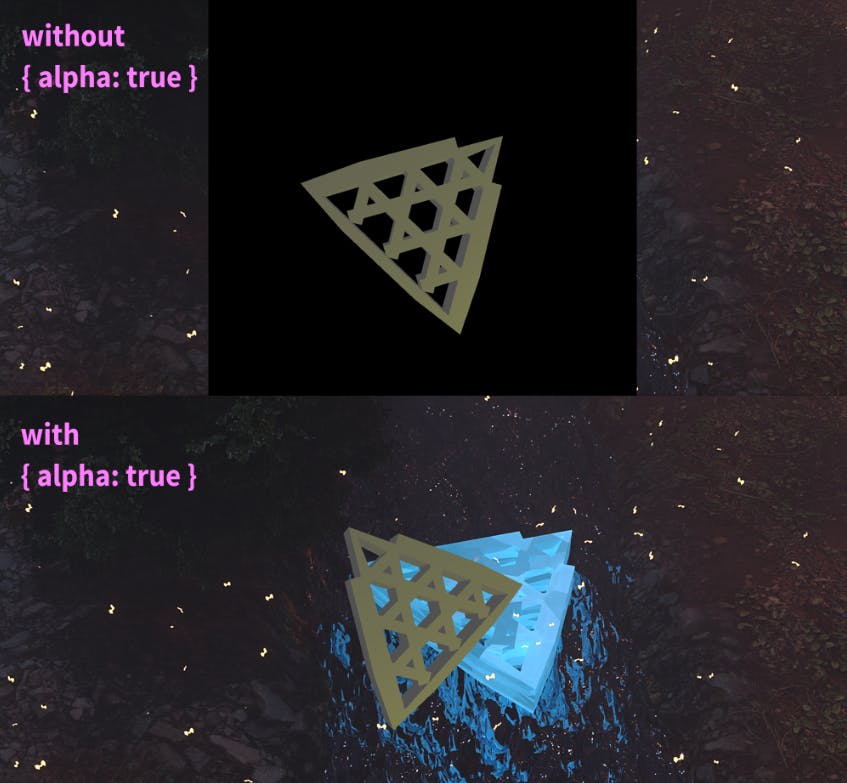
const renderer = new THREE.WebGLRenderer({ alpha: true });
The { alpha: true } makes the empty parts of the scene transparent instead of black.
Do we want Shadow Maps? Nope. It's a very basic scene and we don't like shadows anyway.
(If you don't know what Shadow Maps are, we discusses them in Chapter 1, in Lighting and Shadows.)
renderer.shadowMap.enabled = false;
Now we set pixel ratio to prevent blurring for HiDPI devices,
renderer.setPixelRatio(window.devicePixelRatio);
Now we set the size of our canvas,
renderer.setSize(window.innerWidth, window.innerHeight);
Let's go with lights that mimic the real world lights,
renderer.physicallyCorrectLights = true;
Now let's give our canvas element an id for easy future interaction,
renderer.domElement.setAttribute("id", "three-canvas");
We need append the Canvas to the body (or any HTML element you desire, point is we need to have the canvas in our actual HTML) to actually see it,
document.body.appendChild(renderer.domElement);
Time to set the scene now! Let's create our 3D world,
const scene = new THREE.Scene();
Let's make an ambient light,
const ambientLight = new THREE.AmbientLight(
  0xffffff, /* Color */
  1 /* Intensity */
);
and add it to the scene so it isn't pitch black,
scene.add(ambientLight);
And we're all done with setting up the renderer and the scene!
There's a universe now, a 3D world, there's no one in that world to see it though, which is kind of sad. Let's Fix that!
Camera Setup 📸
So the camera needs to have,
- FOV
- Aspect Ratio
- Near
- Far
Aspect Ratio is width:height of the Camera and Field of View (FOV) is how much of the world the Camera can see.
We covered what Near and Far are in Chapter 1, The Camera.
So Let's define these,
const fov = 60;
const aspect = window.innerWidth / window.innerHeight;
const near = 20.0;
const far = 200.0;
Now we need to Make a Camera with those specs,
const camera = new THREE.PerspectiveCamera(fov, aspect, near, far);
Let's place our camera 50 metres up on the Z-Axis,
camera.position.set(0, 50, 0);
and make it look at the origin
camera.lookAt(0, 0, 0);
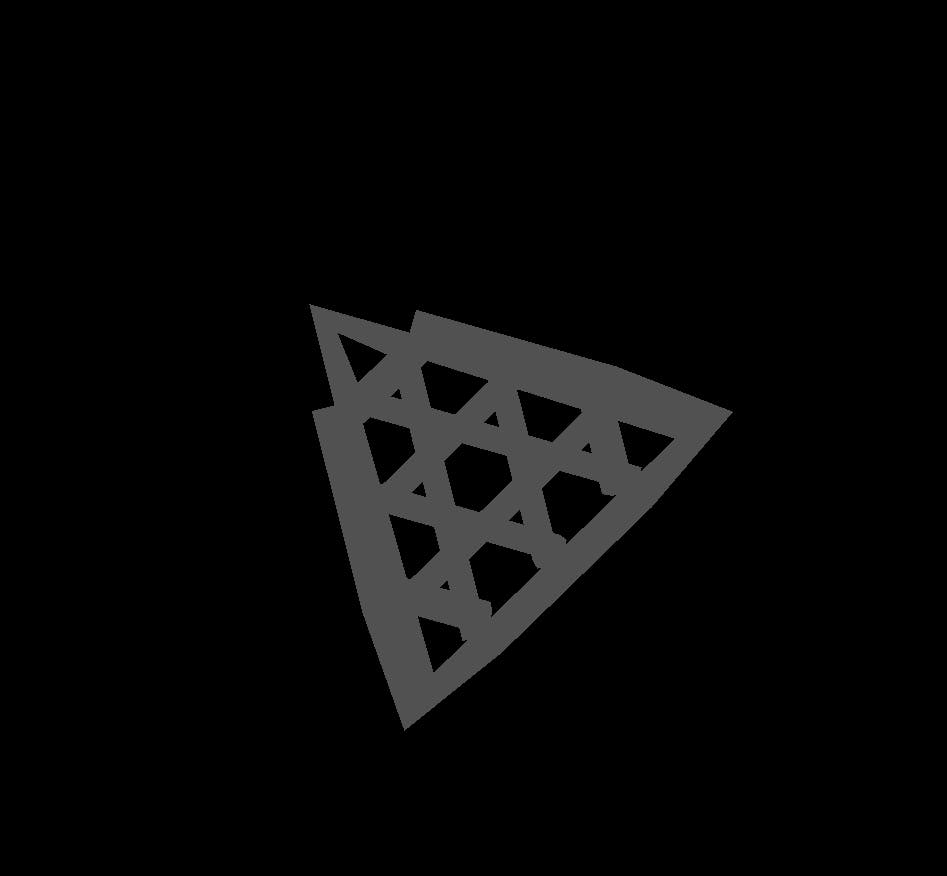
Our Camera is Setup and it looks something like this
Let's now have Something to populate the Scene
Importing a GLTF Model ⌛
For this we need to import GLTFLoader from ThreeJs.
You can do this with webpack by,
import { GLTFLoader } from "three/examples/jsm/loaders/GLTFLoader";
or with vanilla by,
import { GLTFLoader } from "https://cdn.skypack.dev/three/examples/jsm/loaders/GLTFLoader";
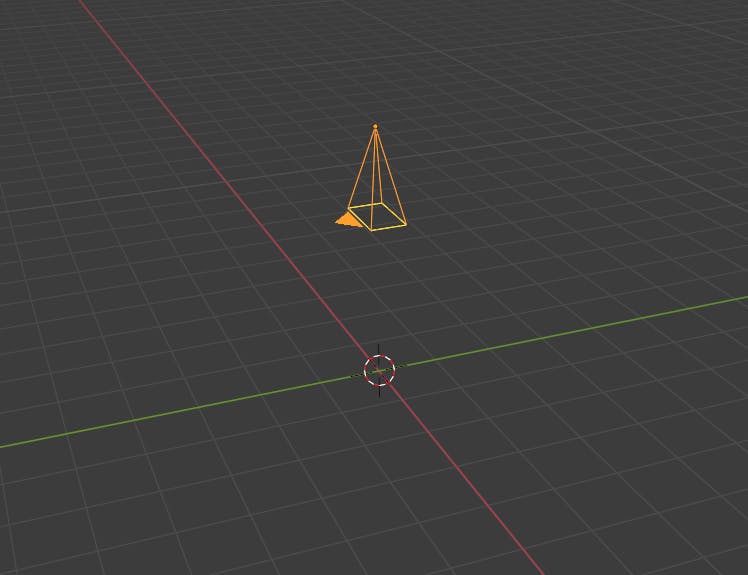
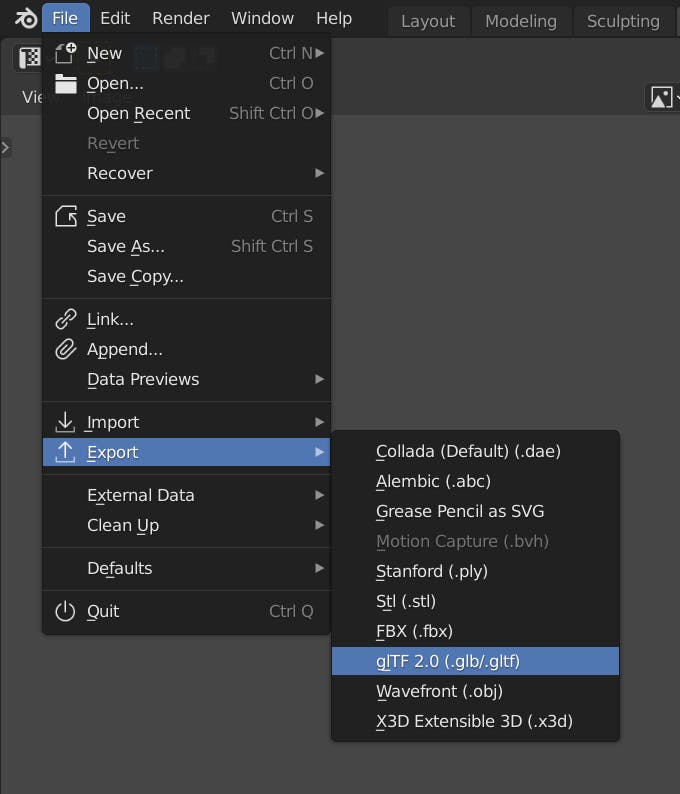
I've already made a ThreeJs logo in blender and exported it as GLTF (which means the format is .glb or .gltf)
Here's how you export your model as GLTF in Blender
Importing a model takes time, So the method that imports a model also takes a callback on what to do with the model once it's imported.
Let's see how that works,
We'll define a variable that'll hold the model in this scope,
let gltfmodel;
Let's make a GLTF loader now,
const gltfLoader = new GLTFLoader();
The .load() method on the loader, has the file path as the 1st argument and the callback function as the 2nd,
Let's load in our model now,
gltfLoader.load("./path/to/model/file.glb", (gltf) => {
here, gltf will be the model data that'll be provided to our function, you can think of gltf.scene to be our actual model
Let's place our model at origin so the Camera stares directly at it,
gltf.scene.position.set(0, 0, 0);
Set its rotation to none,
gltf.scene.rotation.set(0, 0, 0);
And Scale it up a bit in all directions,
gltf.scene.scale.set(5, 5, 5);
Now that our model is exactly how we want it, let's add it to the scene,
scene.add(gltf.scene);
Since the model doesn't yet exist outside this callback function scope, let's assign it to the gltfmodel variable we created earlier so we can later tinker with it later,
    gltfmodel = gltf.scene;
});
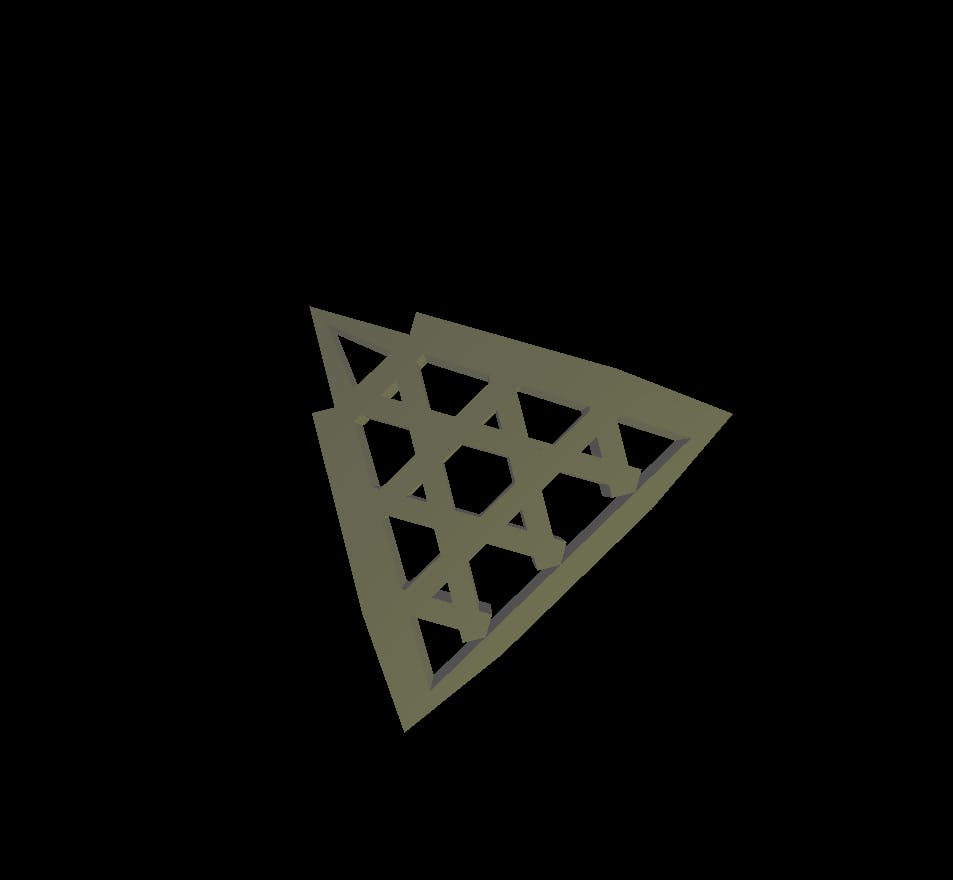
Now our Canvas looks like this,
let's add a Point Light to make it look a little better, more 3D,
// Creating the Light
const light = new THREE.PointLight(
  0xffff00, /* Color */
  30, /* Intensity */
  100 /* Maximum Range of Light */
);

// Placing it at some co-ordinates, here (30, 30, 30)
light.position.set(30, 30, 30);

// Adding it to the scene
scene.add(light);
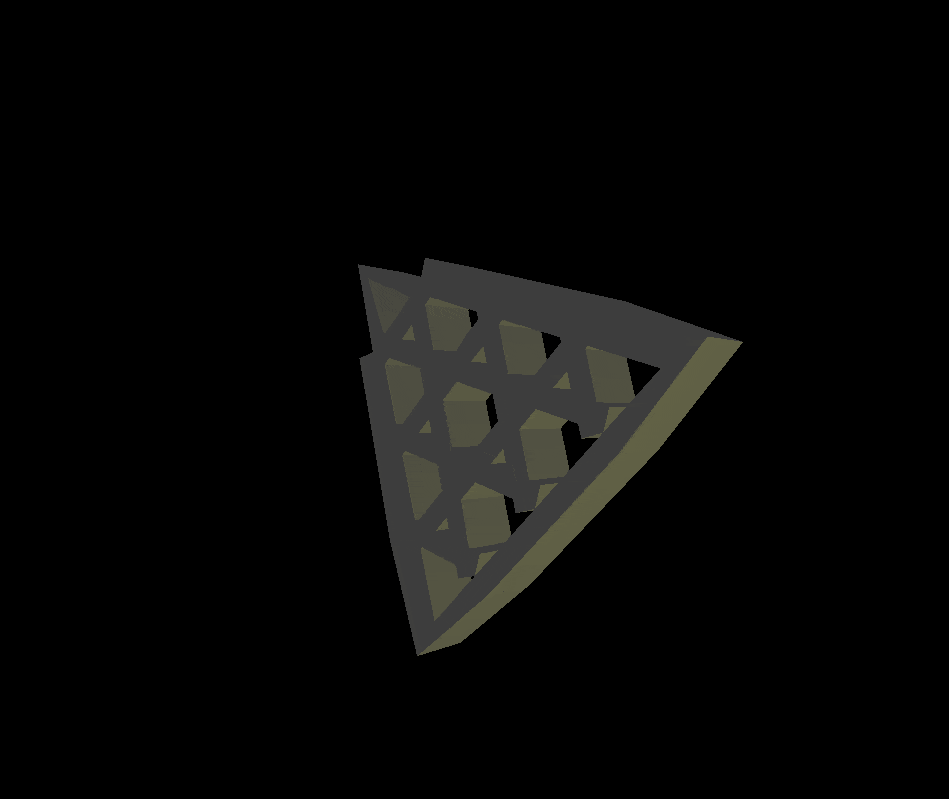
Now it looks much better,
But it's still... still.
If all we wanted was this, we could've just had an image.
So let's animate it
Rendering and Animation 🏃
Every time we want the Canvas to display the new frame, we need to call requestAnimationFrame with a callback that asks ThreeJs renderer to Render.
And since we need to call a new requestAnimationFrame every time the previous finishes, we can just do a recursive implementation, like so,
const RAF = () => {
  requestAnimationFrame(() => {
    // Recursively Render
    renderer.render(scene, camera); /* ThreeJs renders */
    RAF(); /* new requestAnimationFrame is called */
  });
};
and then just call it once,
RAF();
Moreover, we can do small increments / decrements in Rotation, Scale, Position and other properties before each render to get an animation effect, for example,
const RAF = () => {
  requestAnimationFrame(() => {
    /* We're increasing the Z rotation value of our
    model by 0.01 radians every frame */

    if (gltfmodel) gltfmodel.rotation.z += 0.01;

    // Getting our model in the parent scope comes in use now

    renderer.render(scene, camera);
    RAF();
  });
};
We need to be careful of one thing though, see how we're checking if the model exists before we increment it in the above example?
That's because loading a model takes time, and the model might not even be created when the 1st frame renders, so to avoid any errors, we check if it exists first.
And Just like that, we have a Spinning 3D Logo,
Responsiveness ⚖️
Remember all the things we defined earlier related to the width and the height of the canvas?
Yeah we gotta change all that every time the window (the canvas) gets resized.
So let's do that with a resize event listener,
window.addEventListener(
  "resize",
  () => {
    /* Redefining things with new width and height */
    camera.aspect = window.innerWidth / window.innerHeight;
    renderer.setSize(window.innerWidth, window.innerHeight);

    /* Updating the Camera */
    camera.updateProjectionMatrix();
  },
  false
);
Summary 📝
We did it! Our very first ThreeJs App : )
Here's a function that'll do everything we did here,
import * as THREE from "three";
import { GLTFLoader } from "https://unpkg.com/three/examples/jsm/loaders/GLTFLoader";
/* Or */
/*
import * as THREE from "three";
import { GLTFLoader } from "three/examples/jsm/loaders/GLTFLoader";
*/
/* if you're using webpack */

const init = (
  modelPath = "/assets/model.glb",
  size = 5,
  targetClass = "threeD-Logo"
) => {
  const target = document.getElementsByClassName(targetClass);
  if (target) {
    // Renderer and Scene Setup
    const renderer = new THREE.WebGLRenderer({ alpha: true });
    const Cwidth = () => {
      return document.getElementsByClassName(targetClass)[0].clientWidth;
    };
    const Cheight = () => {
      return document.getElementsByClassName(targetClass)[0].clientHeight;
    };
    renderer.shadowMap.enabled = false;
    renderer.setPixelRatio(window.devicePixelRatio);
    renderer.setSize(Cwidth(), Cheight());
    renderer.physicallyCorrectLights = true;
    renderer.domElement.setAttribute("id", "three-canvas");

    target[0].appendChild(renderer.domElement);
    const scene = new THREE.Scene();
    const ambientLight = new THREE.AmbientLight(0xffffff, 1);
    scene.add(ambientLight);

    // Camera Setup
    const aspect = Cwidth() / Cheight();
    const fov = 60;
    const near = 1.0;
    const far = 200.0;
    const camera = new THREE.PerspectiveCamera(fov, aspect, near, far);
    camera.position.set(0, 30, 0);
    camera.lookAt(0, 0, 0);

    // Load GLTF Model
    let gltfmodel;
    const gltfLoader = new GLTFLoader();
    gltfLoader.load(modelPath, (gltf) => {
      gltf.scene.scale.set(size, size, size);
      gltf.scene.position.set(0, 0, 0);
      gltf.scene.rotation.set(0, 0, 0);
      scene.add(gltf.scene);
      gltfmodel = gltf.scene;
    });

    // Add Point Light
    const light = new THREE.PointLight(
      0xffff00 /* Color */,
      30 /* Intensity */,
      100 /* Maximum Range of Light */
    );
    light.position.set(30, 30, 30);
    scene.add(light);

    // Play Animation
    const RAF = () => {
      requestAnimationFrame(() => {
        // Recursively Render
        if (gltfmodel) gltfmodel.rotation.z += 0.01;
        renderer.render(scene, camera);
        RAF();
      });
    };

    RAF();

    // Responsiveness
    window.addEventListener(
      "resize",
      () => {
        camera.aspect = Cwidth() / Cheight();
        renderer.setSize(Cwidth(), Cheight());
        camera.updateProjectionMatrix();
      },
      false
    );
  }
};

init();
You need to have an element already present in the html, preferably an empty div, with a specific class, "threeD-Logo" by default but you change it as the function's 3rd argument.
( If multiple such elements are present, the first one will be chosen )
The function's 1st argument is the model's path, and the 2nd is the Scaling factor.
The Canvas, instead of being window-wide, occupies the target div instead, this offers much better control.
PS: If you put this in a script tag, remember to add type="module" to that tag, like so, <script type="module"> /** CODE HERE */ </script>
Afterword
Hope you liked this article, We'll take a look at ThreeJs primitive shapes, textures, and more in the next article!

We'll see that we don't need to import models to get visually appealing websites, Everything is right there with ThreeJs!
See you in Fun With ThreeJs, I hope you learned something : )
[If you need to contact me, you can comment down below or email me at heaust.azure@gmail.com]