

ThreeJs: How to Click
Chapter 4: Fiddling with Ray Casting and making ThreeJs Objects respond to Clicks and Hovers


Introduction 🫱🏽🫲🏿
ThreeJs renders everything on a plain HTML Canvas, that raises an interesting question, how do we interact with individual objects inside your 3D environment ?
We can't identify a click as we usually do with the DOM as the target of the click will always be the Canvas.
In this article we'll go over the concept and implementation of a clever clicking method, the ThreeJs way!
Prerequisite ✔️
We went over the process of setting up a bunch of scattered cubes with ThreeJs in the last chapter, we won't go over that again here.
This is the boilerplate we're using,
<div style="position: fixed; top: 0; left: 0; width: 100vw; height: 100vh;" class="threeD"></div>
<script async src="https://unpkg.com/es-module-shims@1.3.6/dist/es-module-shims.js"></script>
<script type="importmap">
{
    "imports": {
        "three": "https://unpkg.com/three/build/three.module.js"
    }
}
</script>
<script type="module">
    import * as THREE from "three";
    import { OrbitControls } from "https://unpkg.com/three/examples/jsm/controls/OrbitControls.js";

    const init = (
        targetClass = "threeD"
    ) => {
        const target = document.getElementsByClassName(targetClass);
        if (target) {
            // Renderer and Scene Setup
            const renderer = new THREE.WebGLRenderer({ alpha: true });
            const Cwidth = () => {
                return document.getElementsByClassName(targetClass)[0].clientWidth;
            };
            const Cheight = () => {
                return document.getElementsByClassName(targetClass)[0].clientHeight;
            };
            renderer.shadowMap.enabled = false;
            renderer.setPixelRatio(window.devicePixelRatio);
            renderer.setSize(Cwidth(), Cheight());
            renderer.physicallyCorrectLights = true;
            renderer.domElement.setAttribute("id", "three-canvas");

            target[0].appendChild(renderer.domElement);
            const scene = new THREE.Scene();
            const ambientLight = new THREE.AmbientLight(0xffffff, 2);
            scene.add(ambientLight);

            // Camera Setup
            const aspect = Cwidth() / Cheight();
            const fov = 60;
            const near = 1.0;
            const far = 200.0;
            const camera = new THREE.PerspectiveCamera(fov, aspect, near, far);
            camera.position.set(0, 30, 0);
            camera.lookAt(0, 0, 0);

            // Setting Up Orbital Controls
            const controls = new OrbitControls(camera, renderer.domElement);
            controls.update();

            // Adding Stuff to Our World
            // Add Point Light
            const light = new THREE.PointLight(
                0xffffff /* Color */,
                80 /* Intensity */,
                100 /* Maximum Range of Light */
            );
            light.position.set(30, 30, 30);
            scene.add(light);

            // Add Primitive Shapes
            const randomIntFromInterval = (min, max) => { // min and max included
                return Math.floor(Math.random() * (max - min + 1) + min)
            }

            const spawnRandomCube = () => {
                // Make Shape
                const size = randomIntFromInterval(2, 7);
                const geometry = new THREE.BoxBufferGeometry(
                    size /** height */,
                    size /** width */,
                    size /** length */);
                // Make Texture
                const material = new THREE.MeshStandardMaterial({ color: 0x639af6 });
                // Make Cube
                const cube = new THREE.Mesh(geometry, material);
                // Random Position
                cube.position.set(
                    randomIntFromInterval(-80, 80),
                    randomIntFromInterval(-80, 80),
                    randomIntFromInterval(-80, 80)
                );
                // Random Angle
                cube.rotation.set(
                    THREE.Math.degToRad(randomIntFromInterval(0, 90)),
                    THREE.Math.degToRad(randomIntFromInterval(0, 90)),
                    THREE.Math.degToRad(randomIntFromInterval(0, 90))
                )
                // Add to Scene
                scene.add(cube);
            }

            for (let i = 0; i < 200; i++) spawnRandomCube();

            // Play Animation
            const RAF = () => {
                requestAnimationFrame(() => {
                    // Animations

                    // Recursively Render
                    renderer.render(scene, camera);
                    RAF();
                });
            };

            RAF();

            // Responsiveness
            window.addEventListener(
                "resize",
                () => {
                    camera.aspect = Cwidth() / Cheight();
                    renderer.setSize(Cwidth(), Cheight());
                    camera.updateProjectionMatrix();
                },
                false
            );
        }
    };

    init();
</script>
Concept 🤔
Let's go back to the basics,
We know that whatever the camera sees is being rendered on the canvas,
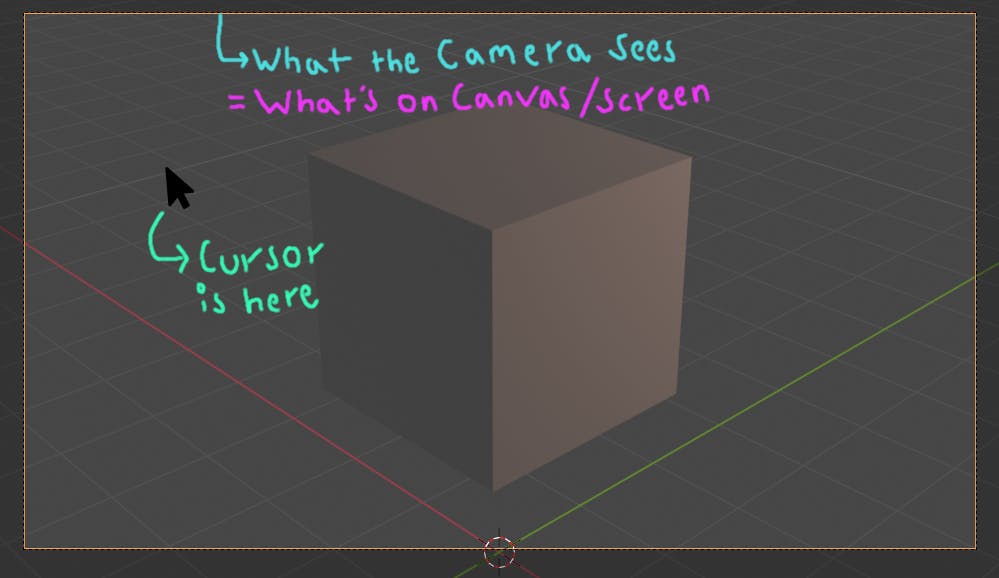
So visually, there's no difference if the cursor was being rendered by browser on top of the canvas or on just above the camera by ThreeJs, so let's pretend the latter for a minute here, in that case...
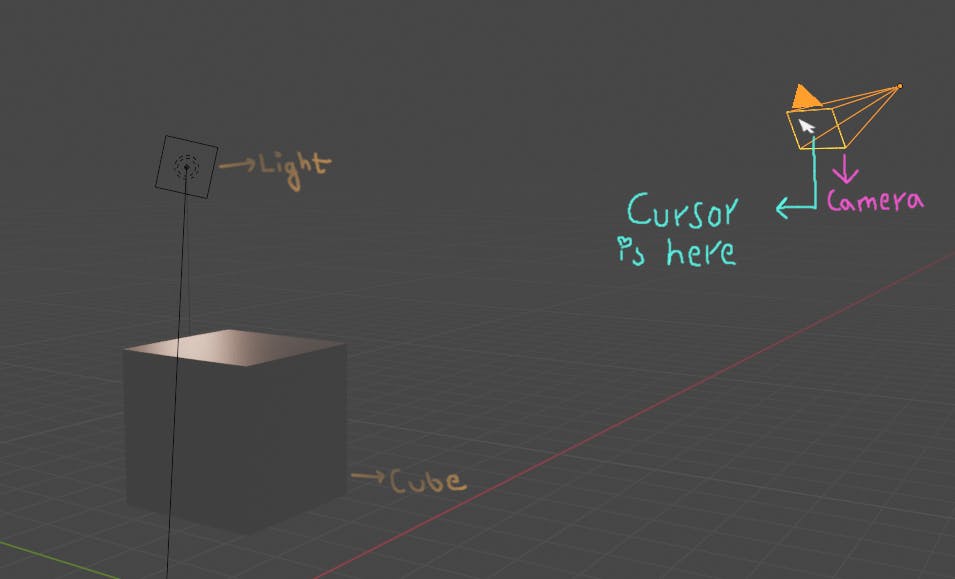
So now that we know where the cursor is half of our problem is solved!
Now all we have to do is Cast a ray from where the cursor is supposed to be perpendicular to our camera's plane,
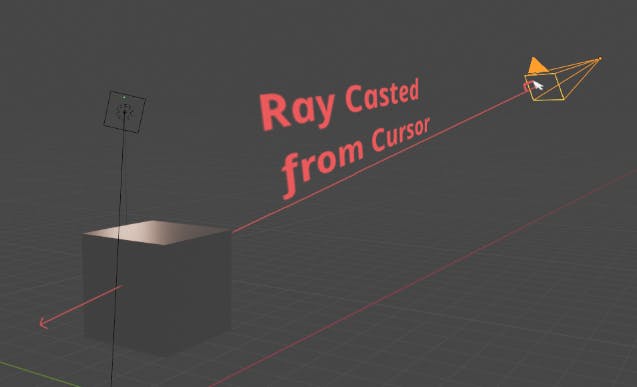
Now whatever intersects with that ray, we can say is the object our cursor is "hovering" over : )
We can do this Ray casting thing over and over constantly to check what our cursor is hovering over.
We can now, having the hover object, easily do "click actions", "hover actions" etc with any objects in the Scene.
A few things to keep in mind here though, you have to keep Ray Casting over and over to stay updated on what the "hover object" is in real time.
Ray Casting is really expensive so doing it too frequently and too much might cause lag, so in our example here we're doing it every 100 ms.
If you're not too concerned with performance you can make it more frequently, just be aware of the trade off.
Implementation ⚙️
This will be right after we set up our Orbit Controls
First we set up a store of items we want to respond to.
It'll just be an array of those objects, but let's give it a proper structure to make it easy to add and remove items.
    // Setting up Store for Raycasting
    let raycastStore = [];
    const addToRCStore = (obj) => raycastStore.push(obj);
    const removeFromRCStore = (obj) => {
        for (let i = 0; i < raycastStore.length; i++) {
            if (raycastStore[i] === obj) raycastStore.splice(i, 1);
        }
    }
now whenever you do scene.add(/** An Object you wanna respond to */), be sure to also do addToRCStore(/** The object */) and removeFromRCStore(/** The Object */) when you no longer want to respond to it.
Now let's setup the Ray Caster that ThreeJs offers and initialize the variables that'll keep track of the mouse position.
    // Setting up RayCaster
    let ndcMouseX = -1;
    let ndcMouseY = -1;
    let rc = new THREE.Raycaster();
We'll refresh the mouse positions whenever the mouse moves,
    document.addEventListener("mousemove", (e) => {
        ndcMouseX = (e.clientX / window.innerWidth) * 2 - 1;
        ndcMouseY = -(e.clientY / window.innerHeight) * 2 + 1;
    });
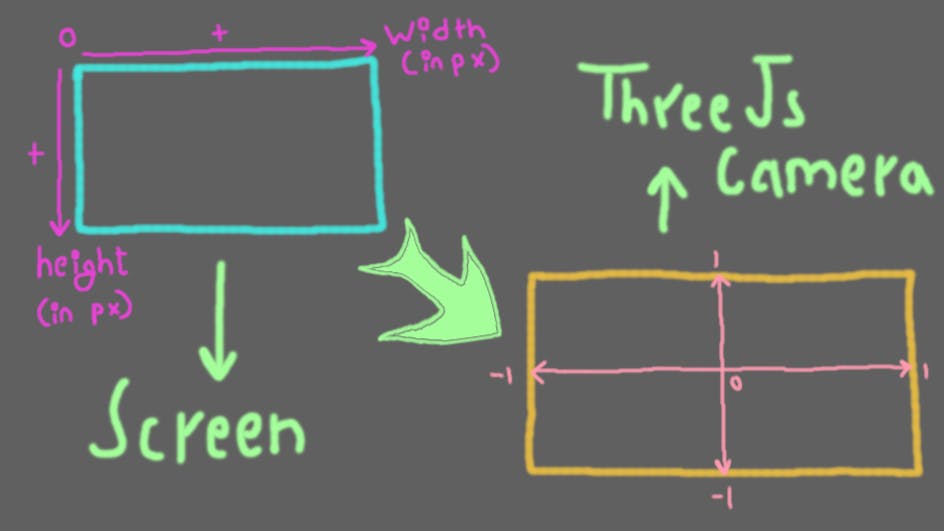
Now notice we aren't exactly keeping track of the mouse pointer but some function of it.
That's because the browser gives us the mouse position values in pixels as units, from 0 to width or height,
But ThreeJs, at render time, scales everything down to a cube of -1 to 1
So we need to make a transformation like so,
Now that that's done, let's actually make a function that checks for intersections and does something if an intersection is found and some other thing when it isn't.
const CheckRC = (camera, onIntersection, onEmpty = () => { }) => {
    rc.setFromCamera(new THREE.Vector3(ndcMouseX, ndcMouseY, 0), camera);
    let intersects = rc.intersectObjects(raycastStore);
    if (intersects.length > 0) {
        onIntersection(intersects);
    } else {
        onEmpty();
    }
}
Now we have a function that performs 1 Ray Cast for us and performs required actions.
This enables us to perform a myriad of responses, for example let's change cursor to pointer on hover of an object,
    const RCJob = setInterval(() => {
        CheckRC(
            camera,
            () => { document.body.style.cursor = "pointer"; },
            () => { document.body.style.cursor = "auto"; }
        );
    }, 100); // Start an Hover Job
Or lets make an object glow on Click,
    document.addEventListener("mousedown", () => {
        CheckRC(
            camera,
            (intersects) => {
                const col = new THREE.Color("#b62886");
                if (!intersects[0].object.material.color.equals(col)) {
                    intersects[0].object.material.color = col;
                    intersects[0].object.material.emissive = new THREE.Color("#AAAAAA");
                } else {
                    intersects[0].object.material.color = new THREE.Color("#639af6");;
                    intersects[0].object.material.emissive = new THREE.Color("#000000");
                }
            }
        );
    }); // Start a Click Job
After all that, this is what we get,
Summary
So in this Chapter we learned how to interact with the objects inside our ThreeJs with our cursor with a clever Ray Casting setup,
Here's the full code for you to setup,
<div style="position: fixed; top: 0; left: 0; width: 100vw; height: 100vh;" class="threeD"></div>
    <script async src="https://unpkg.com/es-module-shims@1.3.6/dist/es-module-shims.js"></script>
    <script type="importmap">
    {
        "imports": {
            "three": "https://unpkg.com/three/build/three.module.js"
        }
    }
    </script>
    <script type="module">
        import * as THREE from "three";
        import { OrbitControls } from "https://unpkg.com/three/examples/jsm/controls/OrbitControls.js";

        const init = (
            targetClass = "threeD"
        ) => {
            const target = document.getElementsByClassName(targetClass);
            if (target) {
                // Renderer and Scene Setup
                const renderer = new THREE.WebGLRenderer({ alpha: true });
                const Cwidth = () => {
                    return document.getElementsByClassName(targetClass)[0].clientWidth;
                };
                const Cheight = () => {
                    return document.getElementsByClassName(targetClass)[0].clientHeight;
                };
                renderer.shadowMap.enabled = false;
                renderer.setPixelRatio(window.devicePixelRatio);
                renderer.setSize(Cwidth(), Cheight());
                renderer.physicallyCorrectLights = true;
                renderer.domElement.setAttribute("id", "three-canvas");

                target[0].appendChild(renderer.domElement);
                const scene = new THREE.Scene();
                const ambientLight = new THREE.AmbientLight(0xffffff, 2);
                scene.add(ambientLight);

                // Camera Setup
                const aspect = Cwidth() / Cheight();
                const fov = 60;
                const near = 1.0;
                const far = 200.0;
                const camera = new THREE.PerspectiveCamera(fov, aspect, near, far);
                camera.position.set(0, 30, 0);
                camera.lookAt(0, 0, 0);

                // Setting Up Orbital Controls
                const controls = new OrbitControls(camera, renderer.domElement);
                controls.update();

                // Setting up Store for Raycasting
                let raycastStore = [];
                const addToRCStore = (obj) => raycastStore.push(obj);
                const removeFromRCStore = (obj) => {
                    for (let i = 0; i < raycastStore.length; i++) {
                        if (raycastStore[i] === obj) raycastStore.splice(i, 1);
                    }
                }

                // Setting up RayCaster
                let ndcMouseX = -1;
                let ndcMouseY = -1;
                let rc = new THREE.Raycaster();

                document.addEventListener("mousemove", (e) => {
                    ndcMouseX = (e.clientX / window.innerWidth) * 2 - 1;
                    ndcMouseY = -(e.clientY / window.innerHeight) * 2 + 1;
                });

                const CheckRC = (camera, onIntersection, onEmpty = () => { }) => {
                    rc.setFromCamera(new THREE.Vector3(ndcMouseX, ndcMouseY, 0), camera);
                    let intersects = rc.intersectObjects(raycastStore);
                    if (intersects.length > 0) {
                        onIntersection(intersects);
                    } else {
                        onEmpty();
                    }
                }

                const RCJob = setInterval(() => {
                    CheckRC(
                        camera,
                        () => { document.body.style.cursor = "pointer"; },
                        () => { document.body.style.cursor = "auto"; }
                    );
                }, 100); // Start an Hover Job

                document.addEventListener("mousedown", () => {
                    CheckRC(
                        camera,
                        (intersects) => {
                            const col = new THREE.Color("#b62886");
                            if (!intersects[0].object.material.color.equals(col)) {
                                intersects[0].object.material.color = col;
                                intersects[0].object.material.emissive = new THREE.Color("#AAAAAA");
                            } else {
                                intersects[0].object.material.color = new THREE.Color("#639af6");;
                                intersects[0].object.material.emissive = new THREE.Color("#000000");
                            }
                        }
                    );
                }); // Start a Click Job

                // Adding Stuff to Our World
                // Add Point Light
                const light = new THREE.PointLight(
                    0xffffff /* Color */,
                    80 /* Intensity */,
                    100 /* Maximum Range of Light */
                );
                light.position.set(30, 30, 30);
                scene.add(light);

                // Add Primitive Shapes
                const randomIntFromInterval = (min, max) => { // min and max included
                    return Math.floor(Math.random() * (max - min + 1) + min)
                }

                const spawnRandomCube = () => {
                    // Make Shape
                    const size = randomIntFromInterval(2, 7);
                    const geometry = new THREE.BoxBufferGeometry(
                        size /** height */,
                        size /** width */,
                        size /** length */);
                    // Make Texture
                    const material = new THREE.MeshStandardMaterial({ color: 0x639af6 });
                    // Make Cube
                    const cube = new THREE.Mesh(geometry, material);
                    // Random Position
                    cube.position.set(
                        randomIntFromInterval(-80, 80),
                        randomIntFromInterval(-80, 80),
                        randomIntFromInterval(-80, 80)
                    );
                    // Random Angle
                    cube.rotation.set(
                        THREE.Math.degToRad(randomIntFromInterval(0, 90)),
                        THREE.Math.degToRad(randomIntFromInterval(0, 90)),
                        THREE.Math.degToRad(randomIntFromInterval(0, 90))
                    )
                    // Add to Scene
                    scene.add(cube);
                    addToRCStore(cube);
                }

                for (let i = 0; i < 200; i++) spawnRandomCube();

                // Play Animation
                const RAF = () => {
                    requestAnimationFrame(() => {
                        // Animations

                        // Recursively Render
                        renderer.render(scene, camera);
                        RAF();
                    });
                };

                RAF();

                // Responsiveness
                window.addEventListener(
                    "resize",
                    () => {
                        camera.aspect = Cwidth() / Cheight();
                        renderer.setSize(Cwidth(), Cheight());
                        camera.updateProjectionMatrix();
                    },
                    false
                );
            }
        };

        init();
    </script>
Conclusion
Now we're really getting into the 3D world and how we can interact with it.
One thing you probably noticed in here is that the glow of the cubes looks less like glow and more like a change of color, and you would be right.
To make the glow more "glow"-like we need to apply a post-processing step called bloom.
We'll see that and everything Post-Processing in the next article Post Processing in ThreeJs | Make your Scene Pop
So see you there! As always, hope you learned something : )
[If you need to contact me, you can comment down below, or email me at heaust.azure@gmail.com]